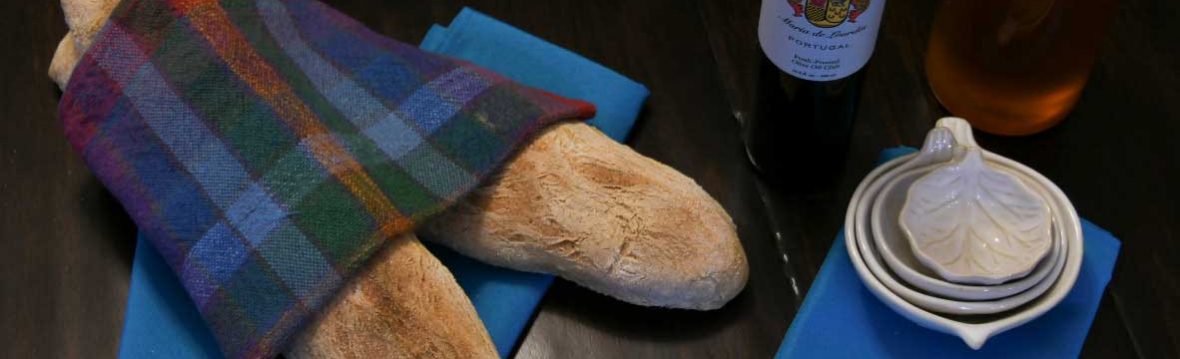
Nothing goes better with homemade jam than buttermilk biscuits. In this video, I teach my daughter Kate how to make biscuits.
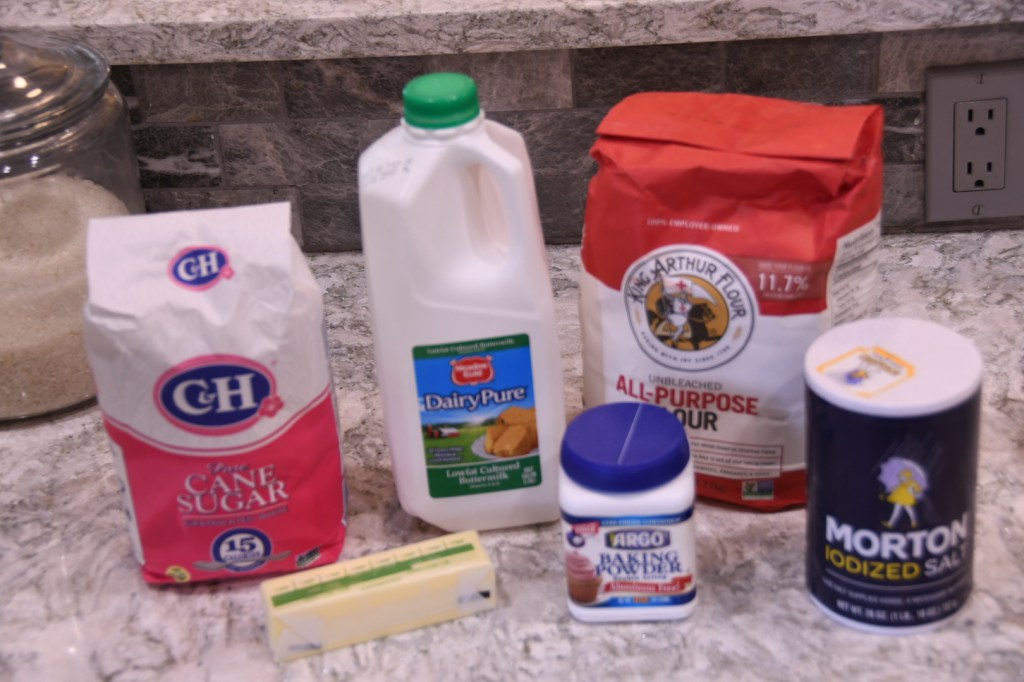
The ingredients are simple–flour, sugar, salt, baking powder, buttermilk, and butter.
Combine the dry ingredients in a bowl. Add the cold butter and cut it into the flour until it is is in small pieces. Make a well in the center of the flour mixture and add the liquid.
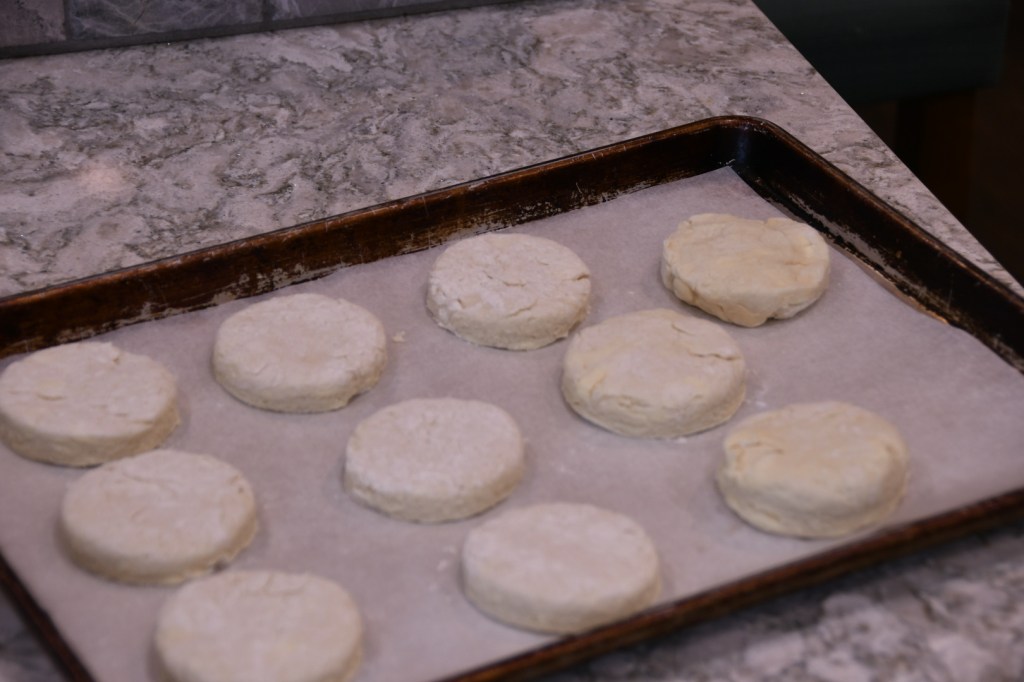
Combine just until all the ingredients are wet. Roll out into a 3/4″ thick dough, then, using a cup or a round cookie cutter, cut out your biscuits. Continue to use the scraps to re-roll out a sheet of dough until it is all used up.
Bake at 450 degrees for 12-15 minutes.
Buttermilk Biscuits
From the Kitchen of Lynnae Hymas
Serves: 4-6
Prep Time: 15 min
Cook Time: 15 min
INGREDIENTS:
2 ½ cups all-purpose flour, plus more for kneading and rolling
3 ½ teaspoons baking powder
1 tablespoon sugar
1 ½ teaspoons salt
½ cup unsalted butter
1 ¼ cups buttermilk (can substitute milk using a ratio of 1 cup milk + 1 tablespoon of vinegar or lemon juice or the whey from clotted cream)
INSTRUCTIONS:
Heat the oven to 450°F. Combine the flour, baking powder, sugar, salt, and baking soda in a large bowl. Add the butter and blend with a pastry cutter until the mixture resembles coarse crumbs. Add the buttermilk and stir just until combined, then transfer dough to a floured surface and knead 5-6 times. With a rolling pin, roll out the dough until is ¾ inch thick. Cut into rounds with a biscuit cutter or glass and transfer to an ungreased baking sheet with the edges of the rounds touching. Gather up the scrapes of the dough, roll them out, and repeat. Bake until the biscuits are golden brown, 12-15 minutes. Serve hot or warm.
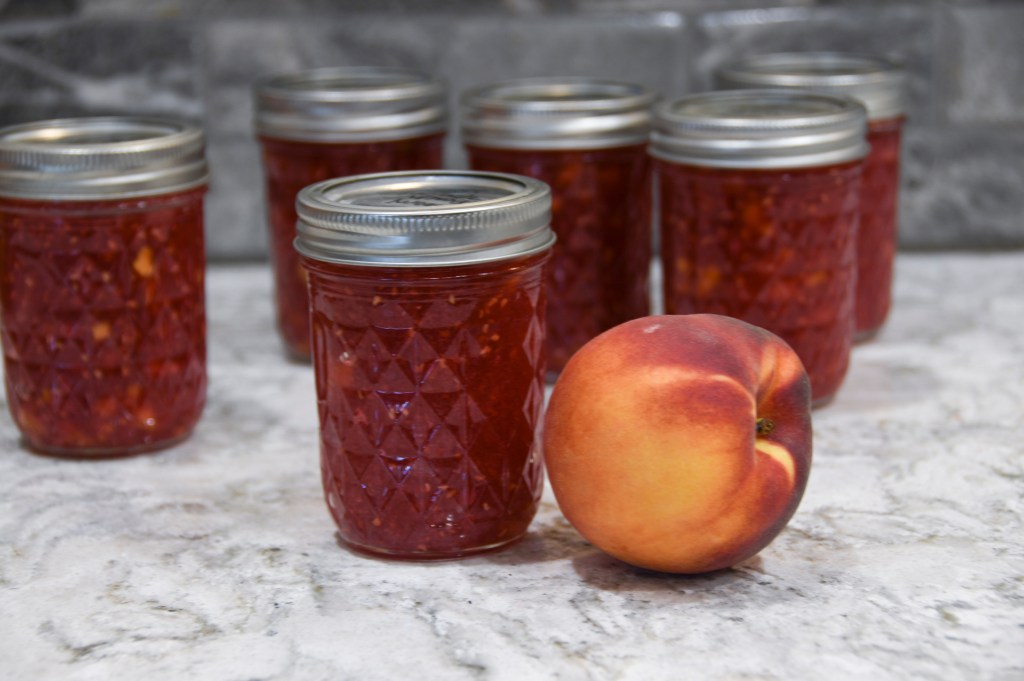
I love the fresh taste of freezer jams compared to regular jam. They are also pretty easy to make. I recently discovered that using CERTO liquid pectin gave me an improved set for my jam.
First, you’ll need to prepare your containers. I usually just wash mine in the dishwasher. Next, prepare your fruit. For this jam, you should mash your raspberries with a potato masher, dice the peaches, and squeeze the lemons.
After preparing the fruit, add the exact amount of peaches, raspberries, and sugar to a bowl. Combine thoroughly. The key to a good jam is getting the sugar to completely dissolve in the fruit. The fastest and easiest way to accomplish this is to microwave it. I start at 3 minutes, test it by tasting it, and then add another minute at a time until the sugar is dissolved.
Now mix the lemon juice and the CERTO in a separate bowl and then add it to the fruit. Combine. The jam should begin to set up fairly quickly. Scoop it into your glass or plastic containers using a funnel and leave 1/2 inch of head space for freezing.
It should mature on the counter top for 24 hours, then go in the refrigerator or freezer. You can store it for up to 3 weeks in the refrigerator, or up to a year in the freezer. Now you can enjoy the fresh taste of summer all winter long.
Raspberry Peach Freezer Jam
From the Kitchen of Lynnae Hymas
Recipe by Sure Jell
Serves: 6 cups
Prep Time: 30 minutes
Wait Time: 24 hours
INGREDIENTS:
1 ½ crushed raspberries (3 cups fresh raspberries)
1 cup chopped fresh peaches (about 1 pound of peaches)
3 tablespoons fresh lemon juice
4 ½ cups sugar
1 pouch CERTO
INSTRUCTIONS:
Measure the exact amounts of crushed raspberries and chopped peaches into a large bowl.
Measure the exact amount of sugar into the fruit and combine.
Let stand 10 minutes. Stir occasionally.
If, after 10 minutes, the sugar is still not dissolved, put the fruit mixture in the microwave on high power for 3-5 minutes until the sugar is dissolved.
Combine the CERTO with the fresh lemon juice in a separate bowl.
Combine the CERTO pectin with the fruit and stir for 3 minutes.
Pour into the prepared containers, leaving ½ inch of head space.
Let the containers stand at room temperature for 24 hours.
You can store the jam in the refrigerator for 3 week or freeze for up to a year.
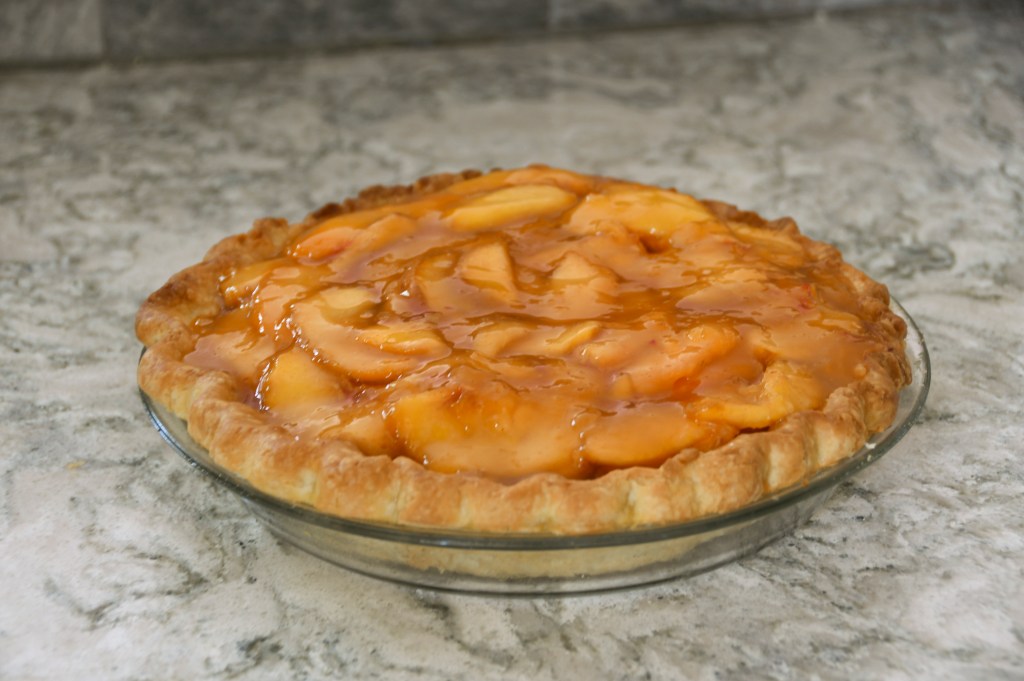
It’s peach season and what could be better than peaches and cream pie? This pie is one your family is sure to love.
You will need to prebake a pie crust. You can make your own, use a refrigerator crust and bake it, or bake a frozen one. I have used all of these methods. I think the biggest bang for your buck if you are short on time is baking a frozen pie crust according to package directions. Marie Calendars is my favorite brand for frozen pie crust. I will also be posting my favorite pie crust from scratch sometime soon.
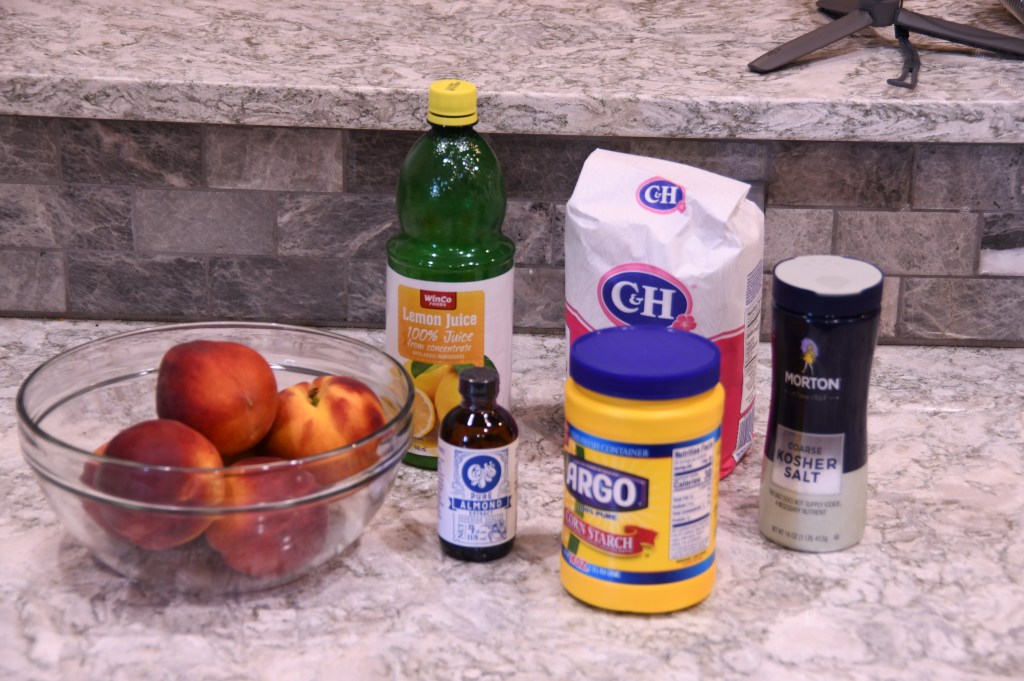
The first step in making the pie filling is to macerate your peaches. This means getting some of the natural liquid out of the fruit using sugar. This will make them soft and sweet and deliciously saucy. Peel the peaches, remove the peach pits, and slice the peaches into thin slices. You can also cut them into chunks, depending on how you want your pie to look.
After the peaches are sliced and in a bowl, add the sugar, almond extract, lemon juice, and salt. Toss all the ingredients together. From here, I like to put them right into a fine mesh strainer over a bowl to collect the juices. You’ll also need to use about 1 cup of the peaches for the glaze. I pull those out now and puree them in a blender or food processor, adding a little water as needed to get them to blend.
While the peaches are draining, we can focus on the cream filling. Add the cream, 1/4 cup of sugar, and the vanilla and almond extract to a bowl. You want to whip these together with a hand mixer until the cream forms into peaks. Next, cream together the mascarpone cheese and the remaining 1/4 cup of sugar, then fold the cheese mixture into the cream. It should be well incorporated.
For the glaze, in a medium saucepan, combine the sugar and the cornstarch. You will collect all the juice you got off of the macerated peaches and then use water to supplement the volume. You need 3/4 c. of total liquid. You also add the pureed peaches to the sauce pan and mix them well. Bring the glaze to a boil over medium high heat, stirring constantly. It should thicken up nicely. Once boiling, continue to cook and stir for 3 more minutes then remove from heat. Allow to cool for at least 10 minutes before assembly the pie.
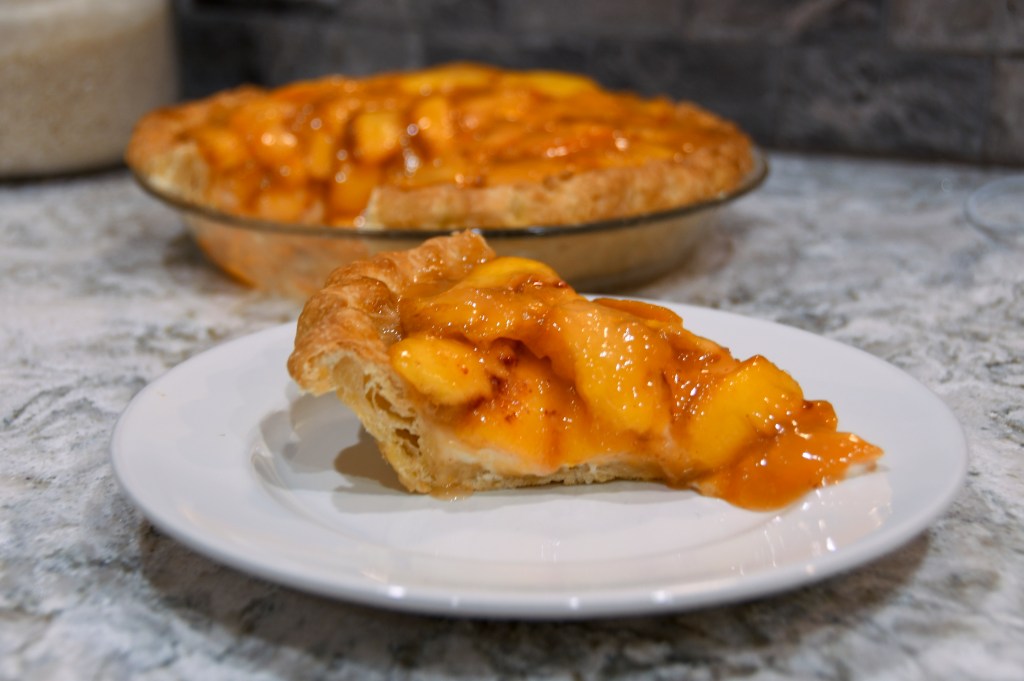
Now the fun part–we get to put all the pieces of the pie together. Fill the bottom of the baked pie crust with the cream filling. You can decide how thick you want the filling, but trust me, there’s really no such thing as too much. Cover the cream filing with a thin layer of the pie glaze. Arrange the peaches on top of the cream filling and glaze and cover them with the remaining glaze. Refrigerate the pie until completely chilled. Enjoy!
Fresh Peaches and Cream Pie
From the Kitchen of Lynnae Hymas
Serves: 6-8
Prep Time: 2 hours
Cook Time: N/A
INGREDIENTS:
Fresh Macerated Peaches
2-3 pounds peaches
¼ cup granulated sugar
½ teaspoon almond extract
1 tablespoon lemon juice
Pinch of kosher salt
Cream Filling
1 cup heavy whipping cream
½ cup granulated sugar
½ teaspoon almond extract
½ teaspoon vanilla extract
8 ounces mascarpone cheese, room temperature
Glaze
1 cup sugar
3 tablespoons cornstarch
¾ cup liquid from macerated peaches + water
1 cup pureed peaches
INSTRUCTIONS:
Macerated Peaches
Peel the peaches, remove the peach pits, and slice the peaches into thin slices. To a bowl, add the peaches, sugar, almond extract, lemon juice, and salt. Toss all the ingredients together. Place peaches in a fine mesh strainer over a bowl to collect the juices. Remove about 1 cup of peaches and puree them in a blender or food processor. Set aside the puree for the glaze.
Cream Filling
Beat the cream, ½ of the sugar, and the extracts together until cream forms into peaks. Cream together the mascarpone cheese and the remaining sugar. Fold the cheese mixture into the cream. Set aside.
Glaze
In a medium saucepan, combine the sugar and the cornstarch. Add the peach liquid and water as well as the pureed peaches and combine. Bring to a boil over medium high heat, stirring constantly. Once boiling, continue to stir for 3 more minutes then remove from heat. Allow to cool for at least 10 minutes.
Assembly
Fill the bottom of the baked pie crust with the cream filling and spread around. Cover the cream filing with a thin layer of the pie glaze. Arrange the peaches on top of the cream filling and glaze and cover them with the remaining glaze. Refrigerate until completely chilled.
Last summer, we went on a family vacation to Punta Mita, Mexico and stayed at a resort there. It was an EPIC trip! Here are a few photos in case you were on the fence about going yourself. Just do it! (After COVID-19 of course).
We quickly realized that nothing beats a virgin mojito poolside or on the beach. I probably ordered 3-4 a day at $5 a pop. I couldn’t help it! Definitely a splurge!
It seemed simple enough to make, so when we got home, I figured out my own recipe.
Put 3-4 mint leaves in the bottom of a glass and bruise them up to release the flavor. Add the juice from 1 fresh squeezed lime, 3 tablespoons of a cane sugar sweetener. I found I like the Torani Sugar Free Sweetener best. Fill the glass half way with ice, and then add unflavored soda water. Pretty simple. You can thank me later.
Virgin Mojito
From the Kitchen of Lynnae Hymas
Serves: 1
Prep Time: 5 min
Cook Time:
INGREDIENTS:
3-5 mint leaves
1 lime
3 tablespoons Torani Sugar Free Sweetener
Crushed ice
6 ounces carbonated mineral water
INSTRUCTIONS:
Put the mint leaves at the bottom of a 12 ounce glass and bruise them. A mottler works best for this. Add the juice from 1 lime, which is about 2 tablespoons of juice. Add sweetener and then fill the glass up about half way with crushed ice. Finally, top off with the carbonated mineral water. Give it and quick stir and enjoy!
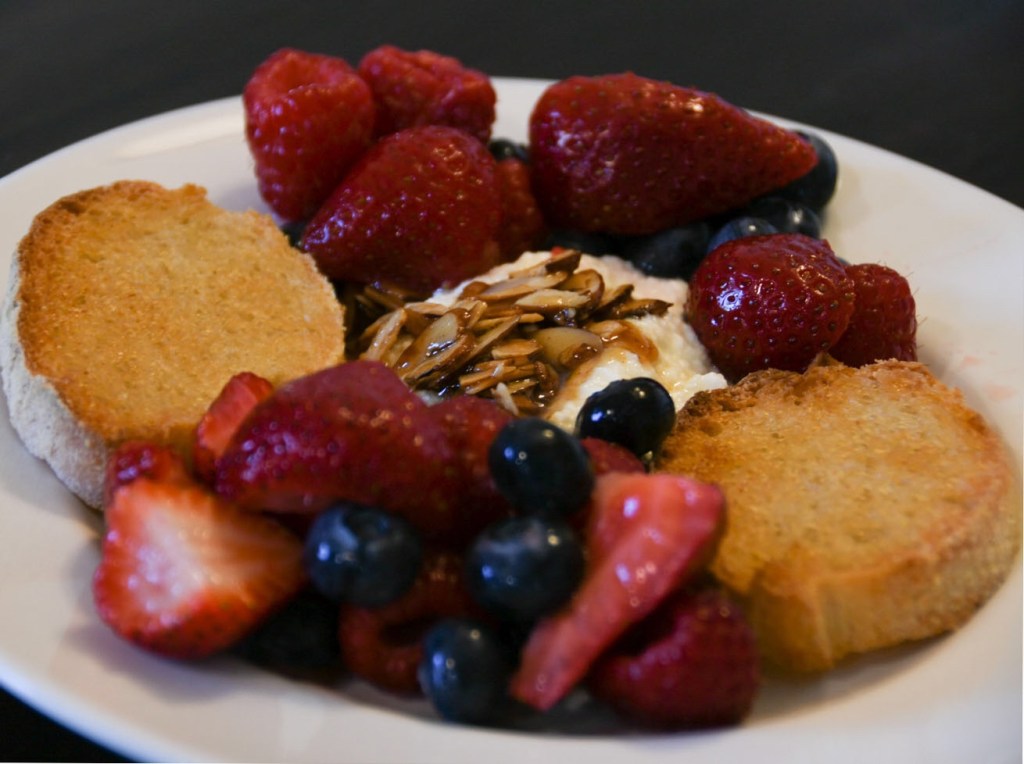
A few weeks ago, I was watching an episode of the Barefoot Contessa, and she made this unusual breakfast dish. I had to try it! It was an instant hit and we’ve made it several times since. I spread the ricotta and almonds right onto my toast. No butter needed. Yum!
This is one way to use the homemade ricotta cheese recipe I shared a few days ago. You start this dish with warm ricotta cheese. To the cheese, add 1 teaspoon of vanilla and 2 tablespoons of honey. Fold it together and set the cheese aside.
The next step is to candy the sliced almonds. Melt 2-3 tablespoons of butter in a sauté pan and add 1/2 cup of sliced almonds and a dash of salt. Stirring constantly, cook the almonds until they just turn golden brown. Do not leave them unattended. They will burn. Add 1/3 cup of real maple syrup and coat the almonds. The mixture should bubble up and caramelize. Set aside.
You can serve this with your favorite toast. (I turned a loaf of our sourdough ciabatta bread into crostini. I cut the bread into thin pieces, brushed them with olive oil, and toasted them in a 400 degree oven for 5-10 minutes until they were golden brown.)
From there, just plate the food. Put a dollop of ricotta in the middle of the plate. Top with almonds. And surround with toast and fruit.
This is absolutely a guest worthy dish. You can serve this as a sophisticated dessert or a light breakfast. Your guests won’t soon forget this meal.
Fresh mixed berries such as strawberries, blueberries, and raspberries, washed
Your favorite toast or crostini
INSTRUCTIONS:
While your homemade ricotta cheese is still warm, add the vanilla and honey and mix together. Set aside.
Melt the butter in a small sauté pan. Add the sliced almonds to the pan and sprinkle with salt. Stir the almonds until they turn a beautiful golden brown color. Add the maple syrup and coat the almonds in the syrup. Remove from heat and set aside.
To plate, put a scoop of ricotta in the center of a plate and top with a spoonful of the almonds. Serve with 1-2 slices of toast and a mixture of your favorite berries.
I love ricotta cheese. It is really versatile. You can use it in desserts, breakfasts, Italian dishes, spreads… I do find that the texture and the cheese can be a little dry. When I make cannoli, I have always used a particular brand of whole milk cannoli because it has a more creamy texture.
I recently found just how easy it is to make homemade ricotta cheese. I was so excited because I have so much more control over the consistency and texture of the cheese to better match the dish I’m making. Plus the fresher the better.
The equipment you need to make ricotta is a heavy sauce pan, a fine mesh strainer, and some cheese cloth. For ingredients, you need milk, cream, salt, and vinegar or lemon juice. That’s it!
You make the base of the cheese by combining the milk, cream, and salt in a heavy sauce pan and bring it to a rolling boil over medium high heat. Then, add your acid and let the milk curdle. It takes about 1-5 minutes. Finally, pour the mixture into a cheese cloth lined fine mesh strainer resting in a bowl. The whey will separate out, leaving the cheese behind. Drain until it reaches your desired consistency. You can speed up the process by twisting the cloth together and providing a little bit of pressure.
INGREDIENTS:
3 ½ cups milk
2 ½ cups cream
1 teaspoon salt
3 tablespoons white wine vinegar or lemon juice
EQUIPMENT:
Cheese cloth
Fine mesh strainer
INSTRUCTIONS:
Add milk, cream, and salt to a heavy pot and bring to a rolling boil. Remove from heat and add the vinegar or lemon juice. Mix together. The mixture will start to curdle. Allow the mixture to sit for 1-5 minutes. Put your strainer in a bowl and line it with a 2-4 layers of cheese cloth. Carefully pour your milk mixture into the cheese cloth and allow to drain until you reach the desired consistency, about 30-60 minutes. You can cool in the refrigerator or use immediately.
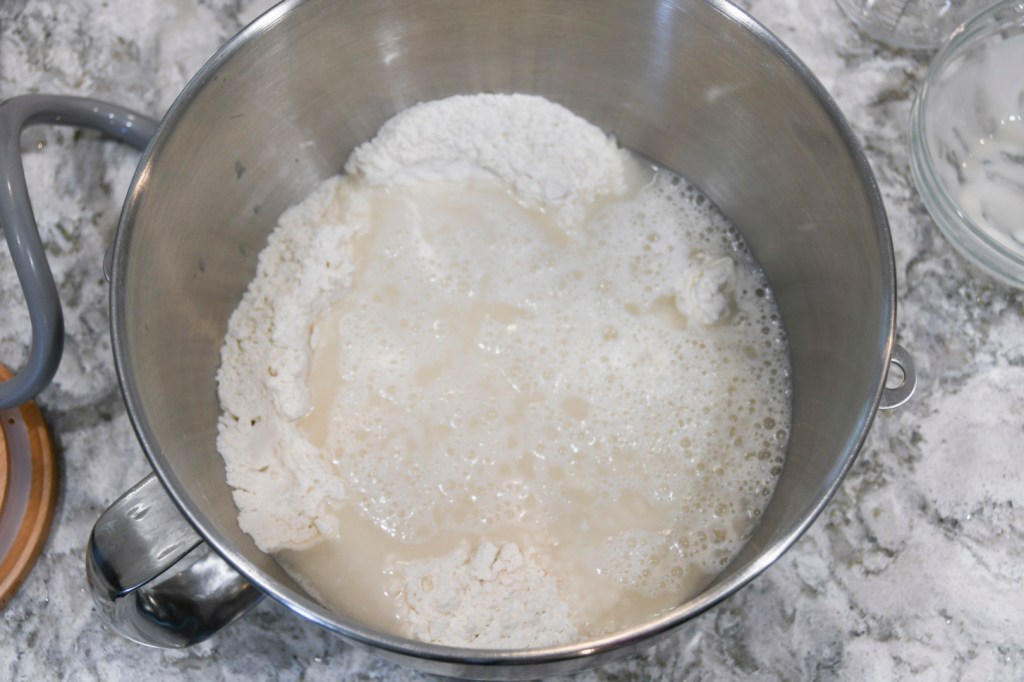
Nothing beats the smell of fresh bread baking in the house. This surprisingly simple sourdough ciabatta bread recipe makes a deliciously crusty loaf on the outside and a soft and tasty inside. Yes, please!
First, mix the dry ingredients together–flour, yeast, and salt. Weighing your flour will give you a much more consistent result. How tightly packed your flour is can really change the actual amount that you are using in a recipe.
Next, add the water and the sour dough starter. Again, weighing these ingredients will give you a much more consistent result.
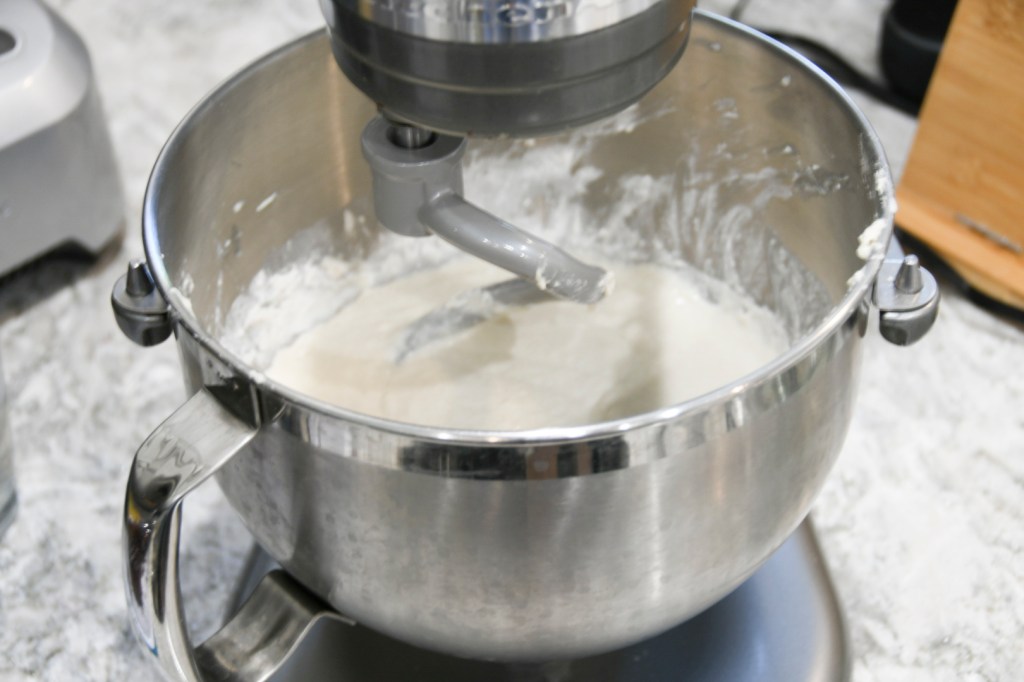
Knead the dough for 10 minutes. Scrape the sides and bottom of the bowl a couple of times to make sure all the flour gets incorporated.
The dough will be very soft and sticky. Store overnight in the refrigerator in an air tight container. The next day, remove the dough from the refrigerator and let it rise on the countertop for at least 4 hours.
When you are ready to cook, sprinkle your countertop with a thick mixture of corn meal and flour, about a 2 to 1 ratio. Divide your dough in half, pulling it into a long baguette loaf, and coat it with the corn meal mixture. Spray a baguette loaf pan with non-stick spray and put your dough in the pan. Allow it to rise and proof for another 60-90 min.
Now the fun part—baking. You need a HOT oven (450 degrees). Unless you are lucky enough to have a steam oven, you’ll also need a spray bottle. Spray the back of the oven with the spray bottle to get some steam going in the oven just before you put the dough in. Continue to spray the back of the oven every 5 minutes or so while the bread bakes. This will give you that hard crusty bread on the outside. The bread should bake for 25-30 minutes.
Allow the bread to cool for a minute and enjoy!
Serving ideas: You can dip it olive oil and vinegar. You could also try toasting the bread and serving it with homemade ricotta cheese and berries.
Sourdough Ciabatta Bread
From the Kitchen of Lynnae Hymas
Makes: 2 loaves
Prep Time: 60 min active; 16-20 hours total
Cook Time: 25-30 min
INGREDIENTS:
21 ounces or 3 ¾ cups bread flour
1 ¼ teaspoons yeast
1 ½ teaspoons salt
10 ounces sourdough starter
13 ½ ounces water
For the outside coating:
1/3 cup flour
2/3 cup corn meal
INSTRUCTIONS:
Add the flour, salt, and yeast to the bowl of a stand mixer, and combine. Add sour dough starter and water to the bowl and mix on low speed with the dough hook for 10 min. The dough should be very soft and sticky. Refrigerate overnight in an airtight container. Set the dough out on the counter and allow to rise for 4 hours at room temperature. Spray a baguette pan with non-stick cooking spray and set aside. Combine 1/3 cup of flour and 2/3 cup corn meal in a bowl and sprinkle onto a clean countertop. Partition the dough into 2 loaves, and coat with mixture of flour and cornmeal. Let the dough rest and rise, or proof, for 60-90 minutes. Bake at 450° F for 25-30 minutes. Using a spray bottle, spray a stream of water into the back of the oven at 0, 5, and 10 minutes. This will help the bread develop its characteristic beautiful hard crust.
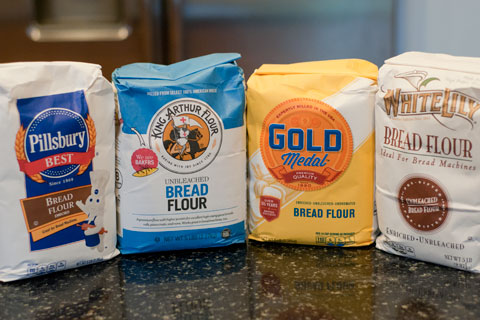
My bread and roll making took a turn for the better a few years ago when I discovered King Arthur Bread Flour. My breads when from alright, to a highlight at the meal. Bread flour has a higher protein content than all-purpose flour. It provides more structure for breads than all-purpose flour.
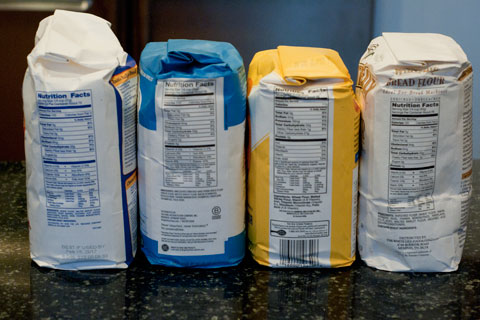
I wanted to conduct an experiment to see if the brand of bread flour I used mattered. I used Pillsbury Best, King Arthur, Gold Medal, and White Lily (which I had a hard time finding in a store but ordered from Jet.com for $2.78 for 5 lbs, delivered).
I then gave my family a blind taste test of Our Best Bites World’s Best Dinner Rolls, to see which one they preferred. (I cut the recipe in half and started with 21.5 ounces of flour). I weighed the flour for each different brand. The King Arthur and Gold Medal batches both needed 4 extra tablespoons of flour (approx. 1.6 ounces). White Lily took 2 extra tablespoons (approx. 0.8 ounces), and Pillsbury worked great with the amount the recipe calls for. Turns out, they were all pretty similar in taste and texture, except for the Pillsbury brand. It had an aftertaste we didn’t like. As for the other three, we had a very slight preference for King Arthur and While Lily over Gold Medal. My rank list went as follows, but the top three were really almost a tie:
1. King Arthur 2. White Lily 3. Gold Medal 4. Pillsbury Best
Going forward, I think we’ll be switching to White Lily because I can get it delivered to my door for almost half the price.
(Note: These are completely my own opinions. I did not receive any compensation from any of the brands or stores mentioned in the this post.)
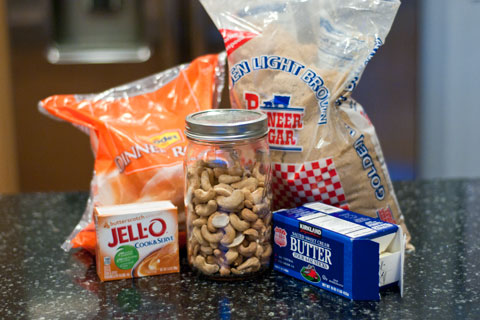
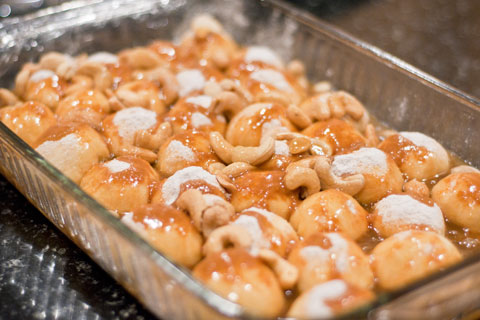
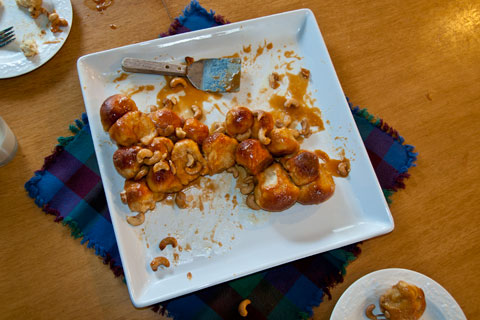
One of our favorite breakfast treats is sticky buns! They are super easy to make and great to take to pot lucks.
5 simple ingredients: Rhodes Dinner Rolls, brown sugar, butterscotch cook and serve pudding, butter, and nuts. I LOVE cashews, but pecans are also delicious.
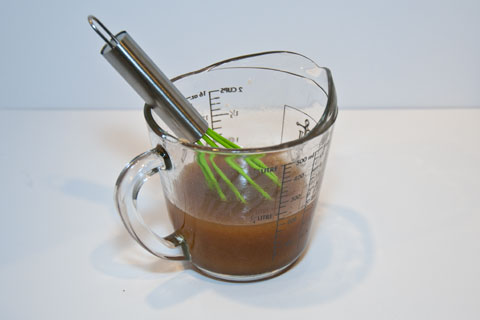
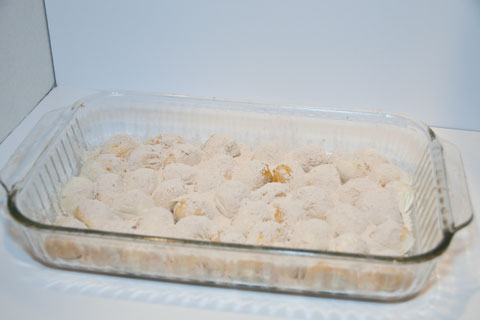
Melt the butter and sugar together in the microwave and mix until they become a syrup. Grease the pan, place the thawed rolls in it. Allow them to thaw enough to cut or slice them in half.
Sprinkle the nuts and pudding mixture over the rolls, then pour the syrup over the top.
Cover and allow the rolls to double in size. I usually make these the night before and allow them to rise overnight. Bake at 350° for 30-35 minutes. Cover the top with aluminum foil for the last 15 minutes. If you don’t, you will have very well done rolls on top and raw rolls on the bottom.
Sticky Buns
From the Kitchen of Lynnae Hymas
Recipe by Rhodes Rolls
Ingredients
·24 Rhodes rolls, thawed but still cold
·½ cup chopped pecans or cashews
·½ small box of non-instant butterscotch pudding mix
·1 cup butter
·1 cup brown sugar
Directions
Spray 9×13 pan with non-stick cooking spray.Cut the rolls in half and place in the pan.Sprinkle with nuts and then the pudding mix.Melt the butter and add the brown sugar.Heat together and mix until a syrup is formed.Pour syrup over the rolls.Cover with sprayed plastic wrap.
Let rise until double in size.Remove wrap and bake at 350° for 30-35 minutes.Cover with foil the last 15 minutes of baking.Do not under bake.Invert onto a serving platter if desired.Serve immediately.
Putting your elbows on the table is frequently thought of as a no-no. While you shouldn’t put your elbows on the table when you’re actually eating, it is perfectly acceptable to do so during a conversation. Leaning forward and resting your elbows on the table is body language that tells other people at the table that you are intently listening to the conversation. And as a side note, don’t fidget while you’re waiting for the meal to be served.