Uncategorized

Blueberry Sauce

We left our blueberry picking adventure with a booklet of recipes to make with our blueberries.  This recipe for blueberry sauce is good on anything from pancakes to ice cream.
Blueberry Sauce 
From the Kitchen of Lynnae Hymas 
Adapted from a recipe by the Couturier Blueberry Farm 

Ingredients 

• ¼ cup sugar 
• 1 tablespoon cornstarch 
• 2 cups fresh or frozen blueberries 
• ½ cup water or fruit juice 

Directions 

In a medium sized saucepan, combine the sugar and cornstarch. Add the blueberries to the pan and mash them with a potato masher and combine them with the sugar mixture. Gradually stir in the water and bring to a boil, stirring constantly. Boil until the sauce is thick.

Uncategorized

Individual Fruit Tart

For Father’s Day this year, the men at church each received an individual fruit tart.  Turns out they are one of my husband’s favorite desserts.  Who knew?  After our Ludington, MI blueberry picking adventure, he asked me to make him a batch.  No surprise here, but they went fast.  This recipe is adapted from Our Best Bites fruit pizza, and the fruit glaze is a recipe from Heather Brown.
Raw Ingredients
Creamed Butter and Egg
Frosted Cookies
Glazed Fruit
Finished Product
Individual Fruit Tarts
From the Kitchen of Lynnae Hymas
Crust
·         1 cup real butter (no substitutions!)
·         1 cup white sugar
·         1 egg
·         1 teaspoon almond extract
·         3 cups all-purpose flour
·         1 ½ teaspoons baking powder
·         ½ teaspoon table salt

Creamy Topping
·         1 8-once package cream cheese (light cream cheese is fine)
·         ¼ cup brown sugar
·         1 cup whipping cream
·         ½ cup powdered sugar
Pizza Topping
·         1 pint strawberries, washed, hulled, sliced, and patted dry
·         1 pint blueberries, washed and patted dry
Clear Fruit Glaze
·         ½ cup Sugar
·         1 cup water or pineapple juice
·         2 tablespoon cornstarch
·         2 tablespoon corn syrup
Directions
For the crust, using a mixer, cream the butter and egg until light and fluffy.  The butter and egg should be room temperature—it’ll take about 5-7 minutes.  Add sugar and extract and cream together.
In a separate bowl combine flour, baking powder and salt.  Spoon the flour into the cup and then level it off with a knife.  Slowly add the flour mixture to the butter mixture and mix until completely combined.
Roll out the dough to about ¼ of an inch thick.  Using a biscuit cutter or  even a quart jar lid ring, cut the dough into individual circles and put on a cookie sheet lined with parchment paper or silicon baking mat.  Cover with plastic wrap and refrigerate for at least an hour. 
Bake at 350°F for 8-12 minutes.  If you like them really soft and slightly chewy, about 8-9 minutes does it. If you like them slightly crisp and buttery, then go for 10-12. Allow to cool completely.
While the crust is cooling, start making the clear fruit glaze.  Bring ½ cup sugar to a boil with ½ cup of the water or juice.  Dissolve corn starch in ½ cup of the water or juice and add it to the sugar mixture.  Cook stirring until mixture thickens and clears.  Stir in corn syrup.  Bring to a boil and then remove from heat.  Cool.
When the crust is almost cool, use an electric mixer to combine the cream cheese, and brown sugar until light and fluffy. In a separate bowl, whip the cream and powdered sugar until medium peaks form. Fold the whipped cream into the cream cheese mixture and combine well.
Spread the cream cheese mixture over the cooled crust. Arrange the berries as desired over the creamy topping. Using a pastry brush, brush the fruit with the clear fruit glaze. 
Refrigerate until ready to serve. Makes 24 tarts.
Uncategorized

Streusel-Topped Blueberry Muffins

It’s blueberry season here in Michigan.  We spent last weekend in Lundington, MI, and found the most amazing u-pick blueberry farm, Couturier Blueberry Farm.  We came home with at least 30 pounds of the most beautiful blueberries.  
We froze most of them to enjoy during the winter months, but, I found myself on a quest for the perfect blueberry muffins.   Of course, I didn’t have to look too far, because the girls at Our Best Bites never disappoint.  Here is Kate’s delicious recipe:


Streusel-Topped Blueberry Muffins
Recipe from Our Best Bites 
1 ¾ cups all-purpose flour, plus 1 tablespoon, divided
2 ¾ teaspoons baking powder
¾ teaspoons table salt
½ cup sugar, plus 1 tablespoon, divided
2 teaspoon grated orange or lemon peel
1 large egg
¾ cup buttermilk
⅓ cup canola oil
1 cup fresh or frozen blueberries
1 tablespoon flour
1 tablespoon sugar
Streusel Topping
¼ cup sugar
2 ½ tablespoons flour
½ teaspoon cinnamon
1 ½ tablespoon butter
Preheat the oven to 400°F.  Prepare your muffin tins with liners or coat with shortening and flour. Add the 1 ¾ cups flour, baking powder, salt, 1/2 cup sugar, and peel into a bowl.  Spoon the flour into the measuring cup and level it with a knife to ensure the correct volume of flour.   Make a well in the center of mixture.  In another bowl, whisk the buttermilk, egg, and oil.  Add to the dry ingredient well and stir until moistened.
In a separate bowl, combine 1 tablespoon flour and 1 tablespoon of sugar.  Toss the berries in the mixture until well coated.  Fold the berries into the batter and spoon the batter into the muffin tin, filling each cup ⅔ full.  
Mix the streusel topping by combining the sugar, flour, and cinnamon.  Cut the butter into the mixture with a pastry cutter or fork until the mixture is crumbly.  Sprinkle over the top of each muffin cup.  Put the muffin tin into the pre-heated oven and bake for about 18 minutes, until the tops are a golden brown.  You can test the muffins by inserting a toothpick into the center of one of the muffins. If it comes out clean, they are done.  Allow to cool in the pan for about 5 minutes and then cool them on a cooling rack.  Makes 12 muffins.
Uncategorized

Greek Yogurt

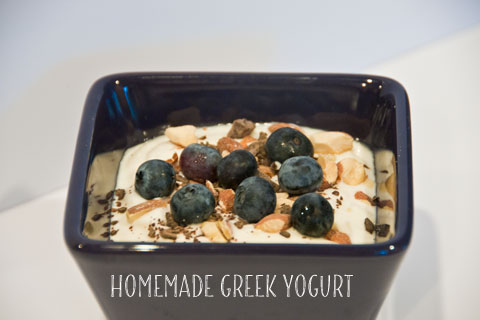
I love Greek yogurt. Not too long ago, I tried this amazing Chobani Flip Greek yogurt cup and swore I could never go back to normal yogurt. But, the treat is expensive, and my kids love it as much as I do, so, we made our own version.

First, pour a gallon of whole milk into a heavy pot.  The way the milk is processed can affect the outcome of the yogurt.  I used to use Kroger milk, and then all of the sudden my yogurt started coming out with a funny texture.  I finally switched to slightly more expensive brand of milk and the yogurt came out great again.

I use my enameled Dutch oven. The heavier the pot, the less scalding of milk you will get. Then, heat the milk to 185 degrees F over medium to medium high heat. Once you reach that temperature, cool the mixture back down to about a 120 degrees F.

When the milk temperature drops below 130, I like to add my sugars and flavorings because they help to further cool the milk. Flavorings and sugars are completely optional, but I will give you my favorites. I use 1 teaspoon of vanilla extract, 2 teaspoons of coconut extract, and 1 cup of sugar. If you prefer it plain, leave these out.

Next, you’ll add your yogurt starter. This is usually cold and can cool the batch below 120 degrees. Don’t panic. I’ve never had a problem as long as it’s around that temperature. You will get your starter from an existing batch of yogurt. It does NOT need to be Greek. You can start with some plain yogurt purchased at the store. Not all yogurts are created equal, so stick with the higher quality brands. I prefer to use four Yoplait Vanilla single serving cups. I like the Yoplait start best of all the kinds I’ve tried. (After you have established a batch, you can use a start from the previous batch you made, saving money. I fill up a pint sized jar with the yogurt before processing to use for a new batch in lieu of the containers of yogurt. However, it seems to turn out creamiest using a fresh start from the store).

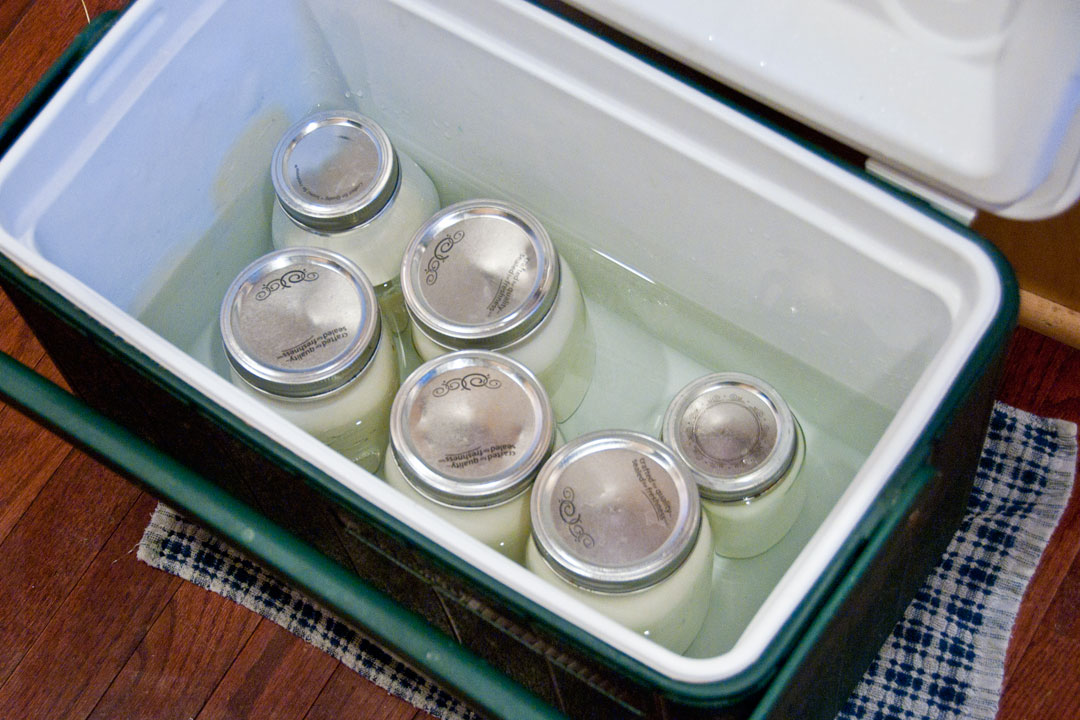
At this point, I fill the bottom of a medium sized cooler with the hottest water I can get from my sink, which is around that magic 120 degree number. Be careful not to fill it too high. You want to be able to put your jars of yogurt in without covering the lids with water.

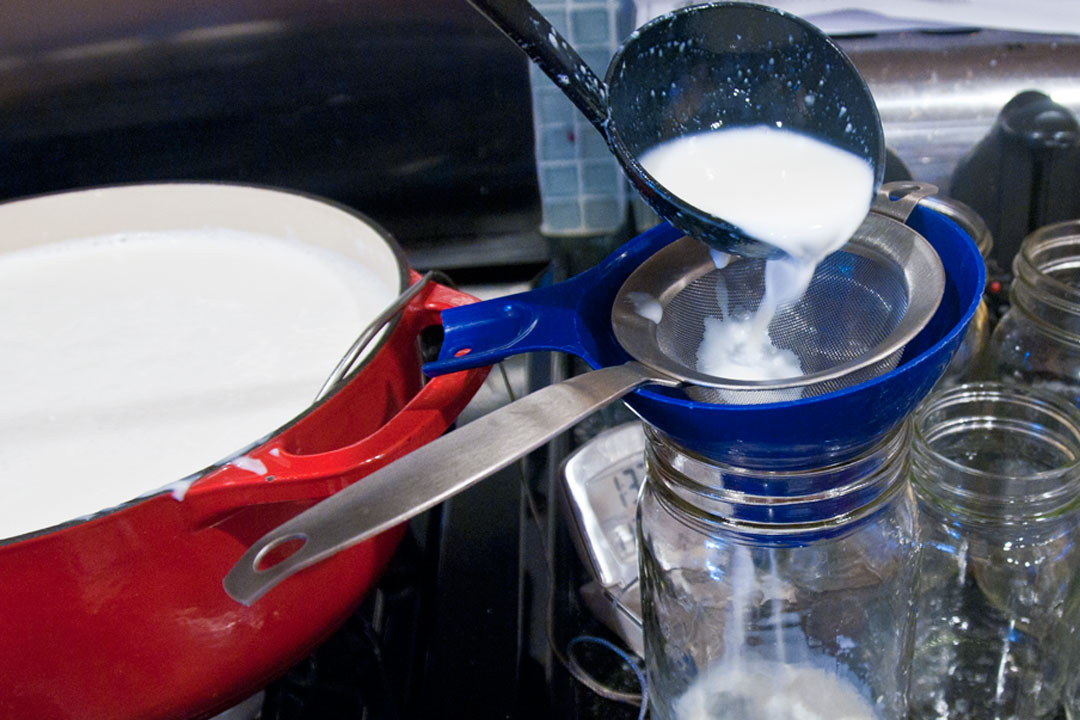
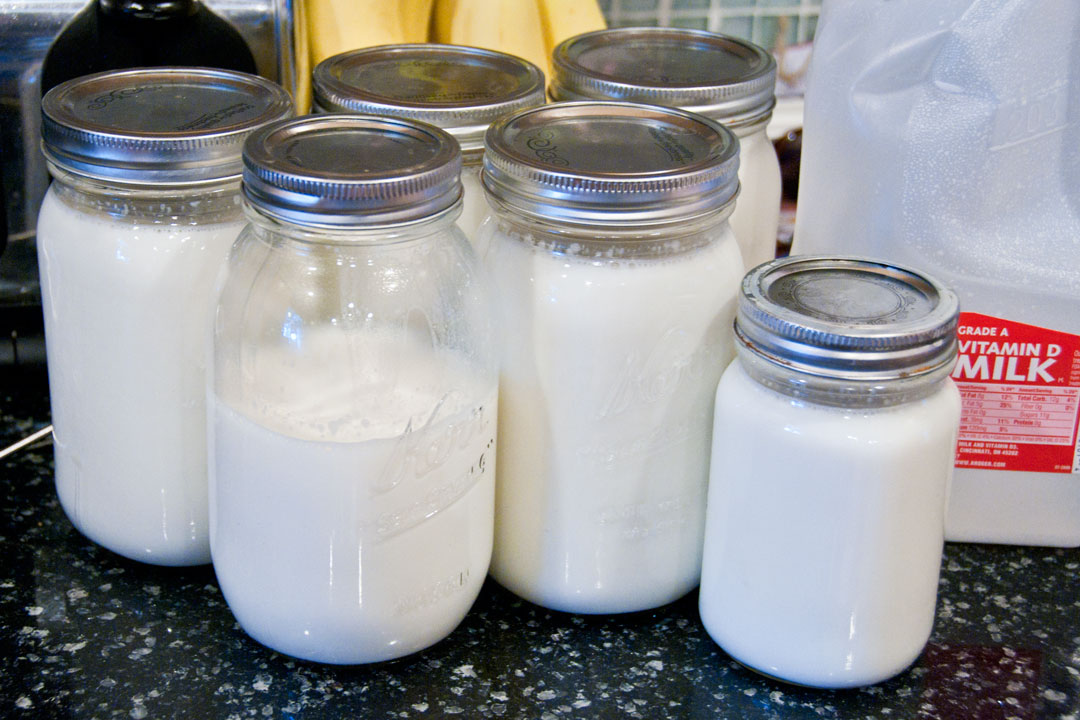
Next, fill your jars with the yogurt. I found the easiest way to do this is with a ladle and a large mouth funnel. I also like to strain the yogurt through a fine mesh strainer to get any milk skim out, but that is an optional step. 

Finally, put the lids on the jars and put them in the warmed up cooler to incubate for 3-6 hours. The less time, the less sour the taste will be. I have found 4 hours to be ideal for us. Refrigerate overnight and you have yogurt.

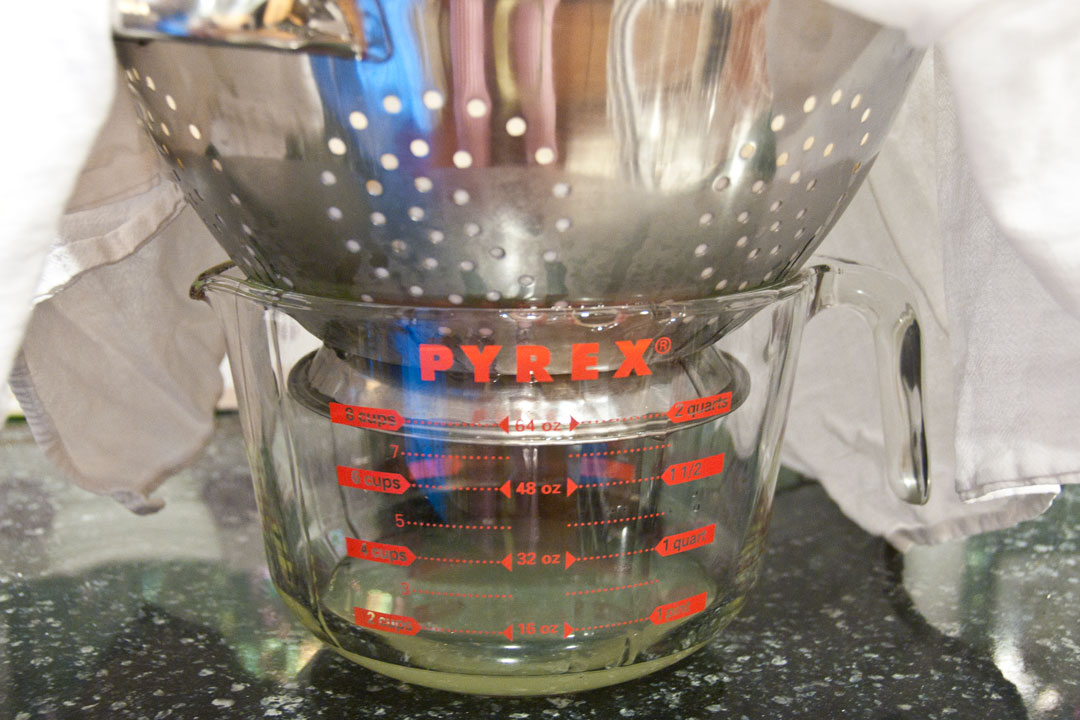
Now the fun part, turning it into Greek. Line your colander with the cloth and set them inside a larger bowl. Then, empty 2-3 quart jars (depending on how much room you have) of the yogurt into the cloth to allow about the whey to drain off, stirring occasionally. Drain off about 40%-50% of the original volume until you have the creamy consistency you dream of. The lower bowl will be full of whey, which I currently just dispose of. Return the yogurt to a jar and keep refrigerated. Repeat with the remaining jars of yogurt, reserving a pint sized jar if you are planning on using it for the start for your next batch.

Greek Yogurt
From the Kitchen of Lynnae Hymas

 Supplies


·          Cooler
·          Large heavy pot
·          5 quart jars and 1 pint jar and lids
·          Small, fine meshed strainer
·          Large mouth funnel
·          Ladle
·          Thermometer
·          Colander
·          Bowl
·          Tightly woven cheese cloth or similar cloth

Ingredients

·         1 gallon milk
·         4 small containers Yoplait vanilla yogurt
·         1 c. granulated sugar
·         1 tsp vanilla extract
·         2 tsp coconut extract

Directions

Heat the milk in a heavy sauce pan to 185 degrees.  Cool to 120 degrees.  Add sugar, extracts, and Yoplait yogurt.  Using the ladle, strain the yogurt into the quart jars through the fine mesh strainer, using the large mouth funnel.  You can fill a pint jar to use as a start for your next batch of yogurt instead of the Yoplait,  Fill the bottom of a large ice chest with 120 degree water.   Incubate the yogurt for 4 hours.  Refrigerate overnight. 

Using a colander lined with a cloth and resting on another bowl, strain off about 40% to 50% of the whey and return the yogurt to a quart jar.


PDF copy

Uncategorized

Pizza Dough

We’ve experimented with a few difference pizza dough recipes around here.  This is now my go to.  I adapted Bobby Flay’s recipe just a titch.  Enjoy!

2 1/2 to 3 c bread flour (King Arthur is the best, seriously)
1 c cake flour
1 tsp sugar
1 1/2 tbsp. yeast
2 tsp kosher salt
1 1/2 c. warm water
2 tbsp. olive oil

Combine flour, sugar, yeast, and salt in the bowl of a stand mixer.  Add the water and the oil while the mixer is running.  If the dough is stick, add more flour, one tablespoon at a time.  If too dry, add 1 tbsp. of  water at a time.  It should form a soft ball.  Allow to rise one hour (I often skip this step with pizza dough, and it still turns out, but letting it rise is best).

Divide dough into to equal pieces.  Roll out and top with your favorite pizza sauce, cheese and toppings.  I usually make and freeze one of the pizzas on a cardboard cake plate.  Bake at 425 degrees for 12-15 minutes.

Uncategorized

Porcupine Meatballs

1/2 c uncooked riced
1/2 c water
1 tsp onion powder
1 tsp salt
1/2 tsp celery salt
dash of pepper
1/4 tsp garlic powder
1 lb ground beef

Sauce:
1 can (15 oz) tomato sauce
1 c water
2 tbsp. brown sugar
2 tsp Worcestershire sauce

Combine the rice, water, onion powder, celery salt, pepper, and garlic powder.  Add the beef and mix together.  Form into 1 to 1 1/2 inch balls.  Heat 2 tbsp. oil in a skillet and brown the meatballs.  Drain off any oil.  Combine the ingredients for the sauce and pour over the meatballs.  Cover and simmer for 1 hour. 

(Adapted from Taste of Home Porcupine Meatballs recipe.)

Uncategorized

English Almond Toffee

English toffee is one of my favorite candies to make and eat at Christmas time.  I’ve been known to buy the big containers of the stuff from Costco and then hide them and sneak one (or two) every now and then.  Don’t judge.  🙂   Anyway, the candy is not that hard to make.  Here is my mother-in-law’s recipe.

2/3 c. butter

½ c. sugar
1/3 c. water 
½ tsp salt
2/3 c. raw chopped almonds
¼ tsp baking soda
½ c. chocolate chips
¼ c. chopped roasted almonds

Add butter,sugar, water, and salt to a heavy sauce pan. Cook over low to medium heat,stirring constantly until it boils.  Cookwithout stirring to 236° F.  Add 2/3 cup raw almonds.  Cook to 290° F stirring constantly.  Stir in ¼ tsp baking soda.  Pour onto cookie sheet ¼” thick.  Immediately put ½ cup chocolate chips on topand spread as chocolate melts.  Sprinklewith chopped almonds.

Uncategorized

Cinnamon Rolls

My husband grew up having cinnamon rolls and hot cocoa for breakfast 3 times a year–the first Sunday in April, the first Sunday in October (General Conference Sunday mornings), and Christmas morning.  We have carried on the tradition in our family.  This recipe comes from my mother-in-law, Lorinda Hymas.

One key ingredient we use is King Arthur Bread Flour.  We started using it about a year ago in all our breads, and I still can’t believe what a difference it makes.  The bread has a soft and light texture that it never had when I used all-purpose garden variety flour.  It also rises like gang busters when you combine it with a good yeast (SAF or Red Star are my favorite).  The flour costs a little more, but it is worth every penny, I promise.  I just found it at Wal-Mart for $4 for 5 lbs.  Bon Appetit!

Cinnamon Rolls

2 tbsp yeast

1 tsp sugar
1 c. lukewarm water
2 c. milk, scalded
⅔ c. melted shortening (no substitutions)
1 c. sugar
4 tsp salt
2 beaten eggs
7-10 c. flour

2 cubes butter
brown sugar
cinnamon
 
Dissolve sugar and yeast in water; add milk cooled to lukewarm, shortening, sugar, and salt.  Add eggs; beat well.  Add flour to make soft, slightly sticky dough; be careful not to add too much.  Let stand 10 minutes; knead on lightly floured surface until smooth and elastic.   Place in greased bowl, cover.  Let rise until doubled in bulk.

Divide dough in two.  Roll dough out ½” thick rectangle and spread 1/2 cube melted butter over top.  Sprinkle generously with cinnamon and brown sugar.  Roll up and slice into 1” thick pieces.  Place on a greased cookie sheet.  Repeat with the other half of the dough.  Allow rolls to rise until about double in size.  (Tip: You can speed this process by preheating the oven to 170° F, turning it off, and placing the rolls inside).
When the rolls have doubled, preheat oven to 400° F, and bake in hot oven for 12-18 minutes until slightly golden brown on top. Add your favorite frosting.  We use simple butter cream.
Uncategorized

Italian Cream Cheese Chicken


I haven’t make this recipe in a long time, but it is simple, easy, and delicious.  I love being able to throw some ingredients in the crock pot in the morning and having a delicious dinner in the evening.

Italian Cream Cheese Chicken


3-4 Boneless, skinless chicken breasts

2 cans cream of mushroom soup

4 oz cream cheese

½ packet Dry Italian Salad Dressing Mix

Place chicken in crockpot.  Mix soup, cream cheese, and Italian dressing mix.  Pour over chicken.  Cook for 5-6 hours on low.  Serve over white rice.

Uncategorized

Buttercream Frosting


Buttercream Frosting


1 c. butter, room temperature

4 c. powdered sugar

1 tsp vanilla

¼ c. heavy cream

Cream the butter with an electric mixer.  Add the sugar and vanilla extract and mix on low speed until blended.  Increase the speed to medium and add the cream in a thin stream.  Increase speed to high and then whip until the texture is light and smooth.  Add more sugar or cream to adjust texture as needed.